Homemade Pull Up Bar
If you happen to be a DIY’er like myself, you can save money with these detailed plans for a DIY pull up bar project!
** Update **
I wanted to share an update here – I’ve improved the DIY pull up bar!
I have created a newer version of this pull up bar to allow for more versatility and variety in hand positions. I’ve come up with a 4-Position Pull-up Bar, using the same basic materials that you see below. Check it out!
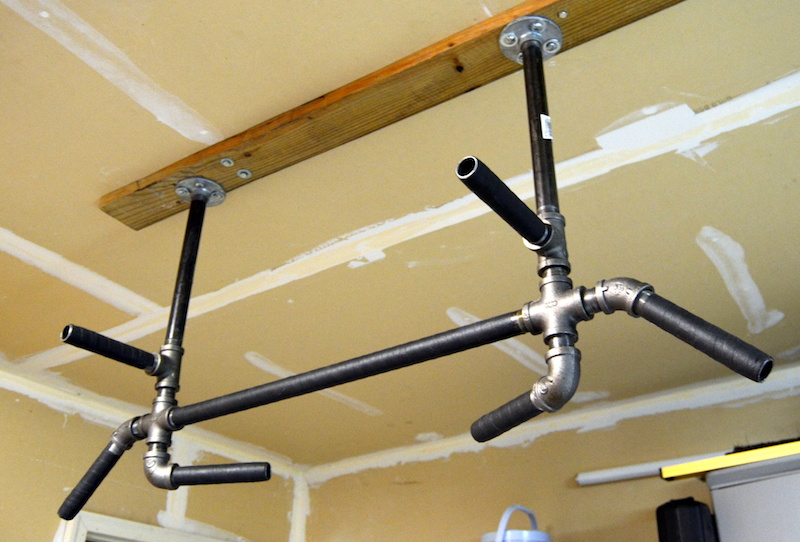
Want to make this version of a pull-up bar?
You can find the full details, including a list of specific materials that were used, on this updated version of the pull up bar here -> Make a Pull Up Bar – Updated
Overview of the Pull Up
The pull up is quite possibly the ultimate measure of strength. It’s also one of the greatest muscle building exercises in existence, which is precisely why it’s been called the upper body squat. The Pull up is also one of the most effective body weight exercises for back muscles. Lat pulldowns can’t even come close to comparing. Whenever you move your body through space, the level of neuromuscular activation is dramatically higher.
With this in mind, many workout routines now incorporate the pull up as one of the main exercises when working the upper body. The popular at-home workout programs, P90X and P90X2 put a major focus on the Pull Up.
There are a number of different pull up bars available today; over-the-door and wall mounted are a few of the most common. And while many of these you can find a local retailer at a price below $50, some are clearly not made as well as others.
Over-the-door Pull Up Bar
Designed to fit over and around a door frame without the need for any drill holes or fixings. The main selling feature of a door mounted pull up bar is the fact that it’s removable. Most models are easy and quick to fit over the door frame and are usually compact and easy to store when not in use.

Pros:
Designed to be portable making them easy enough to pack and take on your vacation or to the office or to friend’s house. They can be placed on the floor and used to perform several exercise including sit ups and tricep dips.
Cons:
One downside with a door mounted pull up bar is that you need a suitably sturdy and sized door frame to mount the bar on. Most bars require doorways to be 24″ to 32″ wide with the doorway trim (molding up) to 3 ½ inches wide. Also, if you are a taller than average person, then you’ll need to tuck your legs back in order to get a full extension during the pull up.
Wall Mounted Pull Up Bar
Wall mounted pull up bars are permanently fixed to a wall. As you can imagine you need 1) a strong (preferably outer) wall to attach the bar to and 2) some very strong anchor bolts for the fixings.

Pros:
Wall mounted pull up bars are generally far sturdier than their door mounted cousins. The solid wall mounting means there’s no shaking or give in the bar when performing a pull up.
Cons:
You need to allocate a space where the bar will remain so will need to think about this carefully before hand. Another disadvantage that you might encounter with some models is if the bar does not extend far enough from the wall, causing you to alter your form when performing the pull up. Knee raises can also be cumbersome with this type was pull up bar.
Chin up vs Pull up
So what is the difference between a chin up vs pull up?
The main differences are visual: the grip. With a Chin Up, your palms are facing towards your body, compared to the Pull Up where your palms are facing away from your body.
Another difference between the chin up vs pull us is the actual muscle being worked. Chin Ups are going to work your biceps much more than your back muscles. Pull Ups are the exact opposite, they will focus your effort on the muscles in your back and less on the muscles in your biceps.
Make a Pull Up Bar
You can make a pull up bar yourself. A Pull Up Bar that will last longer, suite your needs and save you some money in the process. Depending on the room you have available, you can either make a Over-the-door model or a Ceiling mounted model. I chose to go with the ceiling mounted model. I usually will workout in my garage which has 10ft ceilings; perfect for a pull up bar. Plus, the ceiling mounted model does get around the con I mentioned above related to a taller individual trying to do pull ups with a over-the-door model.
Before You Begin
Before you get started with you homemade chin up bar, you will need to make sure that you can find the support beams/studs that will ultimately support the entire installation. Use a stud finder to do this, if the ceiling that you are planning on using is finished/painted. If you do not have a stud finder, add it to the shopping list detailed below.
Shopping List
- 1 – 2 x 6 x 8 Piece of wood – $3.98
- 1 – 8-piece drill bit set $4.97
- 2 – 3/4″ galvanized 90-degree elbows $2.00
- 2 – 3/4″ galvanized flanges $6.54
- 1 – 3/8″ drill bit adapter $2.48
- 8 – Wood Lag Screws $3.92
- 2 – 3/4 x 18 Black Pipe $6.86
- 1 – 3/4 x 48 Black Pipe $5.98
- 8 – 3/8 x 3 Lag Screws $2.70
Total Cost – $39.43 + tax
Construction
I found that constructing the Pull Up Bar at ground-level was a lot easier than trying to construct it while it is being held over your head. The galvanized steel pipe that is being used gets rather heavy in that awkward position.
NOTE: Hand tighten these piece together first until you are sure of the placement of the bar and have confirmed it is square.
- Start with an 18 inch piece of the galvanized steel pipe. Thread the pipe into one end of the galvanized 90-degree elbow. Repeat that process for the other 18 inch piece of pipe and elbow.
- Using the 48 inch piece of galvanized steel pipe, and working with one set of the piece finished in the step above, tighten the pipe into the opposite end of the 90-degree elbow. Repeat this process for the second elbow, be sure to only hand tighten at this point.
- Thread one of the flanges onto the opposite end of the 18 inch pipe that was used in step 1, ensuring that the flange is attached so that the flush/flat side of the flange is facing away from the pipe that it is being threaded onto. Repeat the process for the 2nd flange on the opposite side.
- Flip the bar over so that it is resting on the floor with the flanges resting on a flat and level surface. Now you will need to ensure that the bar is square. You may need to loosen one end of the elbow and then tighten the opposite, but it should eventually settle into a nice and square position.
- Using a pipe wrench or pair of channel locks, tighten all of the connections between the flanges and elbows.
- Mark the position of the support beam/studs on the 2 x 6 x 8 and pre-drill you holes for the lag screws.
- Place the completed bar from step 5 onto the marked piece of wood, ensuring that you are covering any of the marked studs.
- Mark the 4 holes for each flange on the wood and then pre-drill the hole for the wood lag screws.
- Using the 8 wood lag screws, attach the bar to the 2 x 6 x 8 and tighten with a socket wrench.
- Use the other wood lag screws to attach the 2 x 6 x 8 to the ceiling ensuring that you are lining up the support beams/studs that were marked on it in step 6 accordingly and tighten with a socket wrench.


Using the instructions that have been detailed above, you should be able to construct an awesome homemade pull up bar in your garage or house. With this pull up bar in place, you will be able to complete several home exercises for back muscles without compromising your results.